How to Connect IBM WebSphere Portal with Active Directory
In this article I will show you how we make connection of IBM WebSphere Portal with Active Directory. As IBM WebSphere Portal initially authenticate user with an internal file repository known as default WIM file.
In this scenario we will have two Virtual Machines
- Installed IBM WebSphere Portal (VM1)
- Installed Active Directory (VM2)
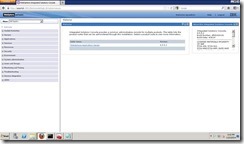
1) Open up WAS Console on (VM1), in my scenario https://acportal:1004/ibm/console
Login with the following credentials (In my scenario)
Username: wpsadmin Password: wpsadmin
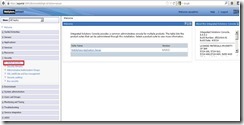
2) Now in the right pane Expand Security and click on Global Security
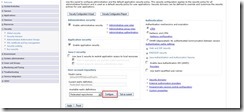
3) Click on the Configure button next to Federated Repository.
It will take you to the Federated Repositories configurations screen.
4) In this screen you will notice that there is one repository in the "Repositories in the realm" list, which is file based repository.
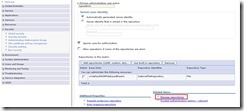
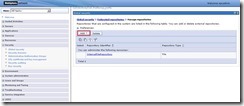
5) In the bottom of this screen under Related Items You can see Manage Repositories.
6) Click on Manage repositories.
7) Click on Add Icon.
At this step, you must have to check your Active Directory, Go to Active Directory Machine (VM2) and Open ADSI Edit by
a. ![]()
![]()
![]() Click on Start Menu All Programs Administrative Tools ADSI Edit
Click on Start Menu All Programs Administrative Tools ADSI Edit
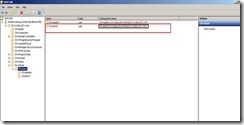
b. A Console Open, in the top Left side of this console you can see ADSI Edit right click and select Connect to it will open the screen just like below figure
c. In Path check Hostname, it will be the hostname of your Active Directory Machine. In my scenario it is rcyber.com, Click OK.
d. See the above figure, it is my active directory in which I have OU name Portal, in which I have two Users.
The reason for going to Active Directory Machine and opening this console is that we need two things, which we have to put in Portal Add Manage Repositories Section
i. Bind Distinguish Name (Select Any User, In my case I am selecting bind7 user distinguish name)
ii. Hostname of Active Directory
8) Now Again Go to Portal Virtual Machine (VM1) after Making Note of Above parameters.
In browser put for Integrated Solution Console https://acportal:1004/ibm/console
9) Follow the path below:
![]()
![]()
![]()
![]() Security Global Security Configure (in front of Federated Repository) Manage repositories Add (LDAP repository)
Security Global Security Configure (in front of Federated Repository) Manage repositories Add (LDAP repository)
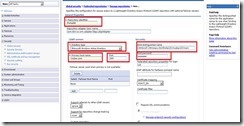
10) Here you find screen in which you have to fill the parameters I have marked with red.
11) ![]()
![]() Click Apply OK Save to Master Configuration.
Click Apply OK Save to Master Configuration.
12) Now follow the below path and Add Repositories in the Realms.
![]()
![]()
![]() Security Global security Configure (in front of Federated repositories) Click on Add repositories (under Repositories in the realm)
Security Global security Configure (in front of Federated repositories) Click on Add repositories (under Repositories in the realm)
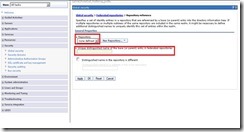
You will see the Screen like below.
13) Now Click on Repository, first rectangle with red outline. Select PortalAD from drop down menu.
14) And in Unique distinguish name of the base, the second rectangle with red outline put the below given entry into it.
OU=Portal,DC=rcyber,DC=com
15) ![]()
![]() Click Apply OK Save to Master Configuration.
Click Apply OK Save to Master Configuration.
Note: In this step you can add as many entries as you want, depending on your environment. In my case I have only 1 OU of Portal in which I have 2 users, One I use for Binding and other one I will use for Login Portal.
After performing above steps be sure that don’t restart Portal Server until you will perform the password changing steps.
PASSWORD CHANGING STEPS:
GO IN Portal Virtual Machine (VM1)
1. Take backup of
C:\IBM\WebSphere\wp_profile\config\cells\DefaultNode\wim\config \wimconfig.xml.
2. Run backupconfig.bat from /wp_profile/bin directory.
3. Stop the WebSphere portal server by following command
C:\IBM\WebSphere\wp_profile\bin> stopServer.bat WebSphere_Portal.
4. Go to Path:
C:\IBM\WebSPhere\wp_profile\ConfigEngine\
And run the following 2 tasks
ConfigEngine wp-change-was-admin-user -DWasPassword=wpsadmin -DnewAdminId="CN=padmin,CN=Users,OU=Portal,DC=rcyber,DC=com" -DnewAdminPw=padmin123 -Dskip.ldap.validation=true
ConfigEngine wp-change-portal-admin-user -DWasPassword=wpsadmin -DnewAdminId="CN=padmin,CN=Users,OU=Portal,DC=rcyber,DC=com" -DnewAdminPw=padmin123 -DnewAdminGroupId=cn=portaladmins,OU=groups,OU=Portal,DC=rcyber,DC=com -Dskip.ldap.validation=true
The above tasks will change the password of WAS Console as well as Portal.
The new login username and password for Portal and WAS Console after Starting Portal Server will be
Username: padmin
Password: padmin123 (for both was and Portal Login)
5. Update C:\IBM\WebSphere\wp_profile\properties\soap.client.props for the future start and stop commands.
6. Now Start Portal Server By following command:
C:\IBM\WebSphere\wp_profile\bin> startServer.bat WebSphere_Portal
For any kind of help, do not hesitate to contact us



1 Comment
Nice article. I have a question after integration with active dir will it create any credential vault? I want to create some mail and calender portlets without asking userid/pwd. so if active directory create a vault then i can get credential from that and pass to mail server.